Authentication & Refresh token flow with Nextjs, Typescript, React Query and axios interceptors.

Frontend Engineer
When it comes to authentication in modern web applications, the most standardised and secure way that most developers and companies go with is rotating refresh token flow. Here's a great documentation about the whole flow Refresh access tokens.
In this post we're gonna implement the whole flow using nextjs, typescript, react query and axios interceptors. We are only going to focus on the frontend side of it to keep things simple, assuming that you already have the backend and necessary APIs for fetching the access token and refresh token, or if you are interested in the backend side of the implementation, let me know in the comments, I'd be happy to write another article for the same 😃.
What is rotating refresh token flow?
We are not gonna go into too much depth here, there are already so many articles and resources out there explaining the theory. Here is a simple illustration by SuperTokens explaining the flow.
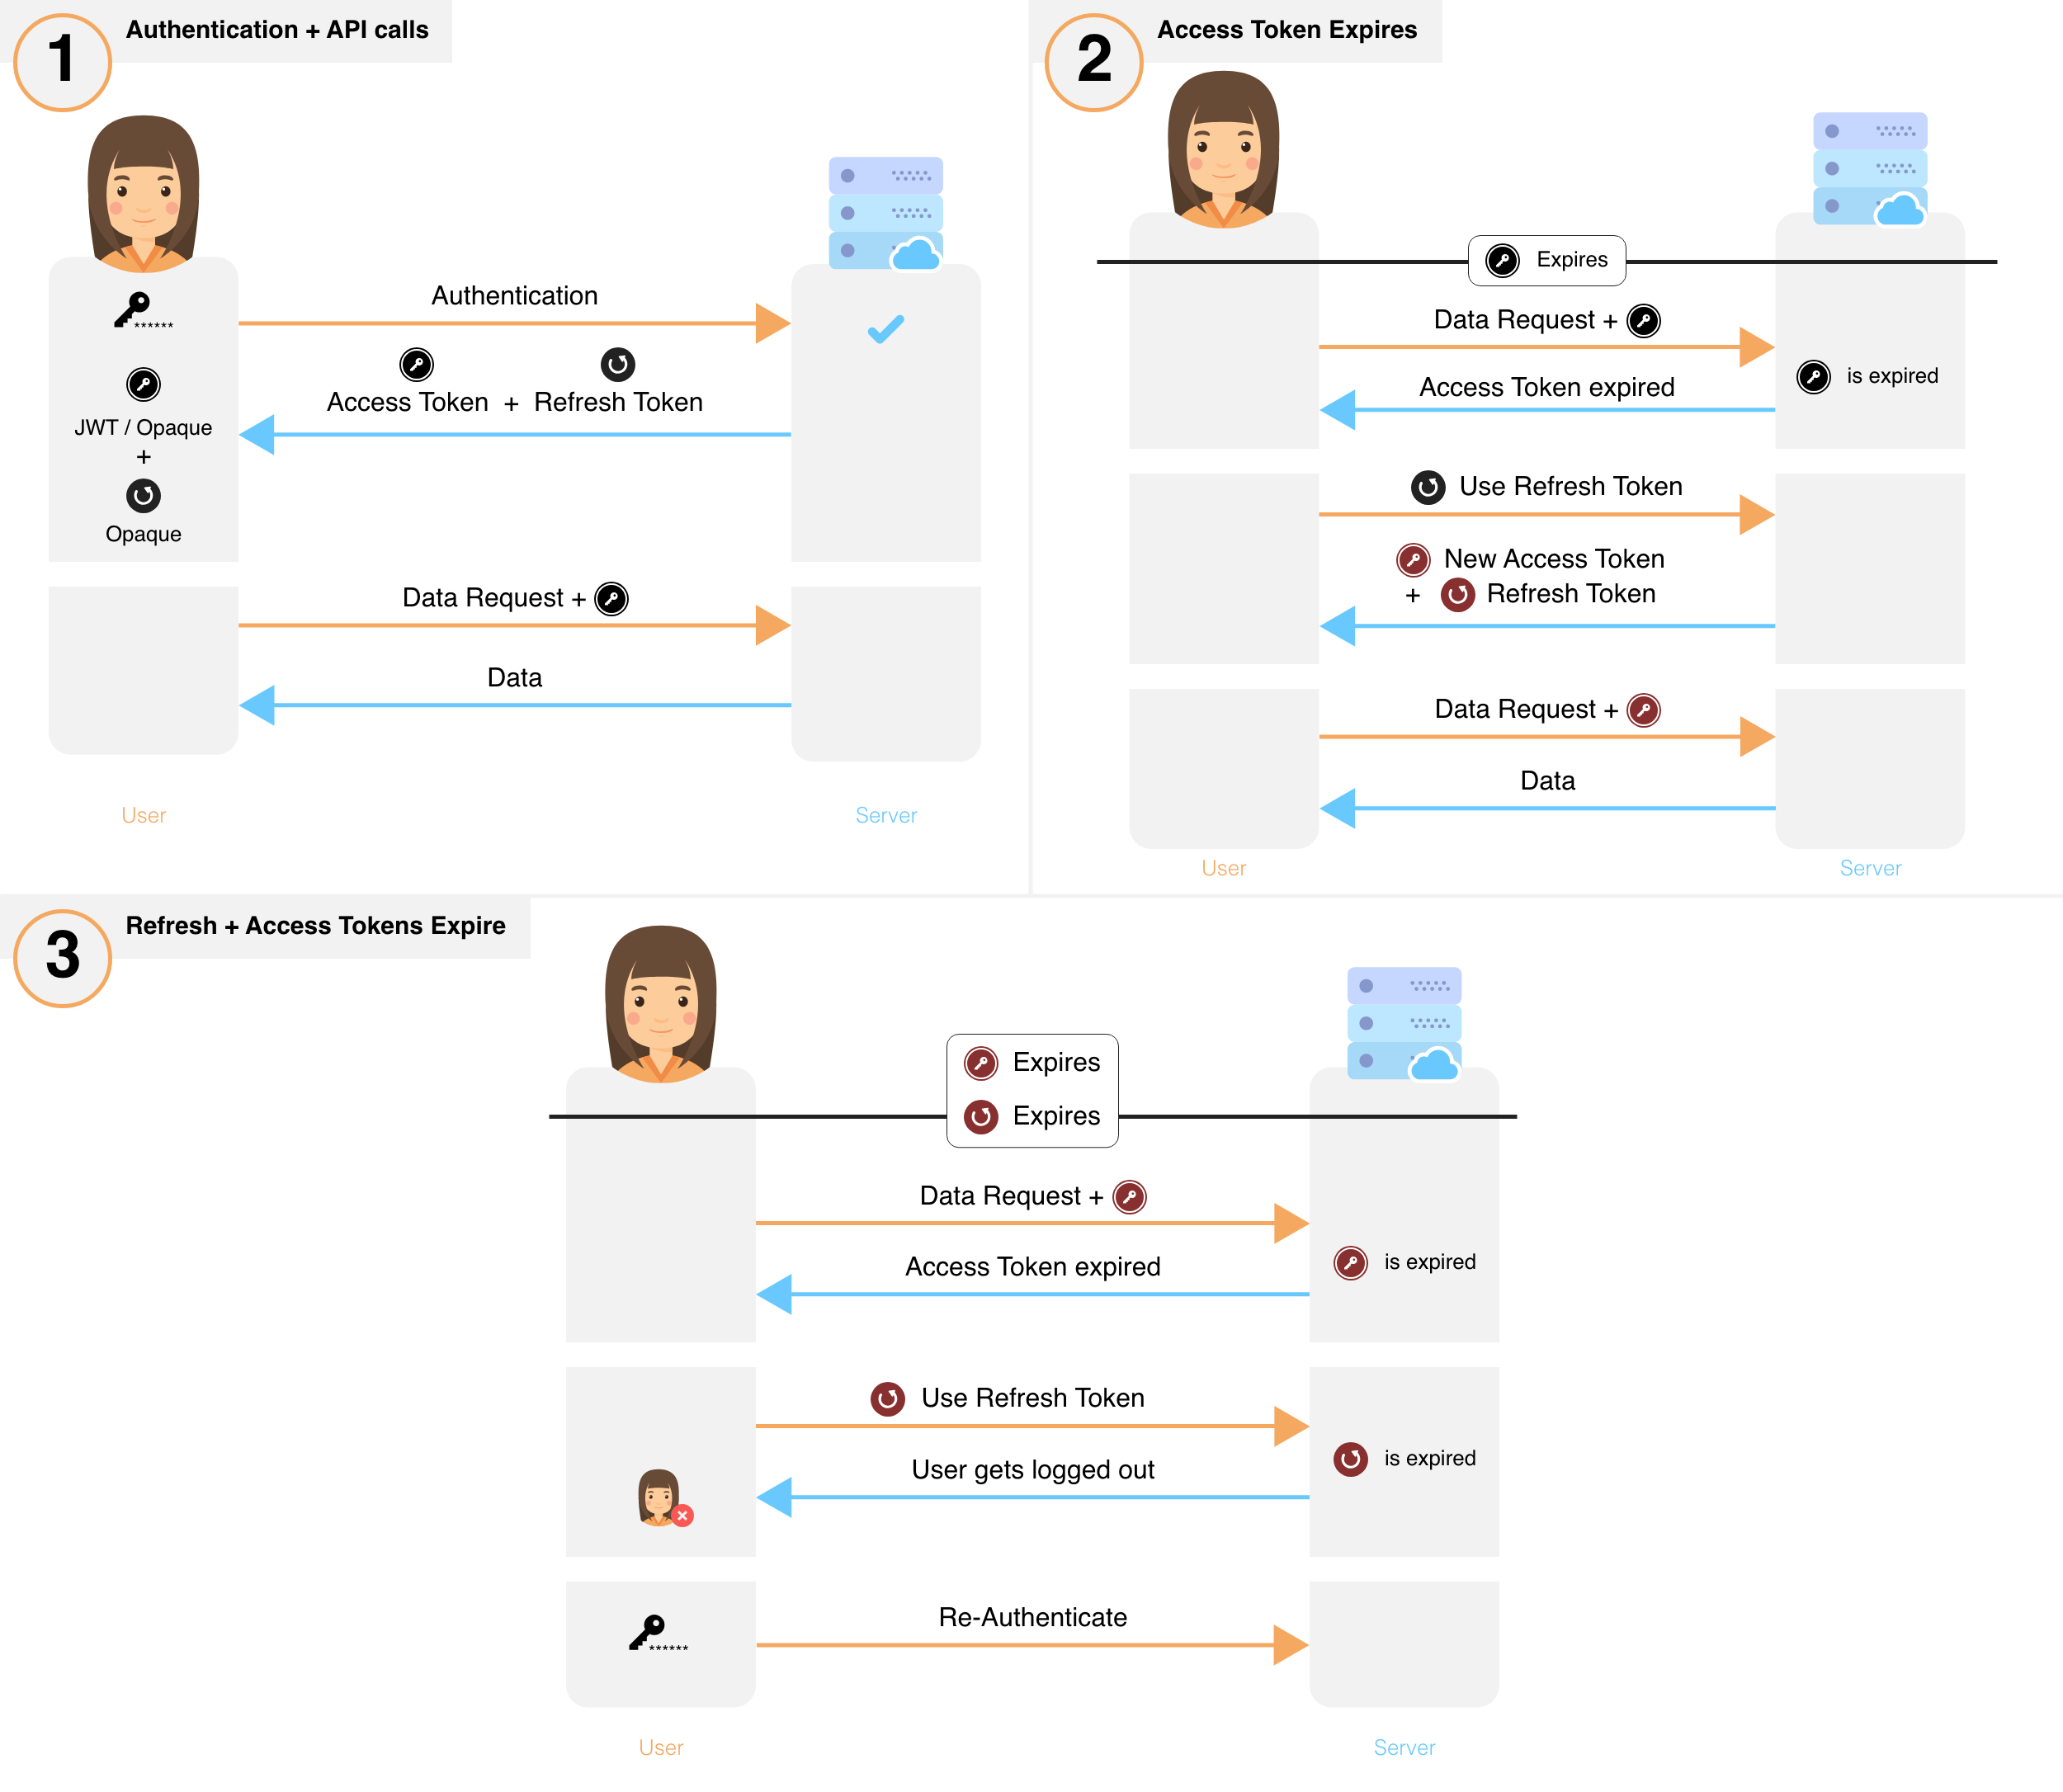
Image by SuperTokens via docs
So basically the flow goes something like this after user enters the credentials and hits the submit button
The backend verifies the credentials and if they are correct then it sends two things in the response, an access token and a refresh token.
The frontend saves both the tokens in localStorage and logs the user in.
The user browses the platform normally until the access token expires, usually the expiry time is short.
The user hits the route to refresh the token and the backend checks if the refresh token is valid, if it is then it again issues two different tokens, one access token and one refresh token, and the frontend replaces the old tokens with the new ones and lets the user continue in the platform.
If for instance both the access token and refresh token expire, in that case the frontend has to log the user out for a new log in session.
So for example if the expiry time of you access token is 24 hours, then every 24 hours your access token will expire and you have to refresh the token, unless of course you log out and log in again, in that case the timer is reset to 24 hours from the time of login. And every time your access token expires, you get a new refresh token too, so the expiry time of your refresh token is reset every time you refresh your token, for instance if the expiry time of the refresh token is 7 days, the only scenario where your refresh token expires and you are logged out of you session is, if you have not used the platform for 7 consecutive days.
phewww 🥱 That's a lot of theory, now let's jump right into coding.
Logging the user in
I'm assuming that you already have you next project set up and running or jump right over here to set it up, and and come back to jump right into the authentication part.
I'm assuming you already have React Query set up in your project, if not head over here to install it and in your _app.tsx you can set it up like this
import { QueryClient, QueryClientProvider } from '@tanstack/react-query';
import { ReactQueryDevtools } from '@tanstack/react-query-devtools';
import type { AppProps } from 'next/app';

const queryClient = new QueryClient();

export default function MyApp({ Component, pageProps }: AppProps) {

  return (
    <QueryClientProvider client={queryClient}>
      <Component {...pageProps} />
      <ReactQueryDevtools initialIsOpen={false} position="bottom-right" />
    </QueryClientProvider>
  );
}
Let's create an axiosInstance.ts file to configure our base URL.
import axios, { HeadersDefaults } from 'axios';

const axiosClient = axios.create();

// Replace this with our own backend base URL
axiosClient.defaults.baseURL = 'https://api.example.org/';

type headers = {
  'Content-Type': string;
  Accept: string;
  Authorization: string;
};

axiosClient.defaults.headers = {
  'Content-Type': 'application/json',
  Accept: 'application/json'
} as headers & HeadersDefaults;

export default axiosClient;
Now that we have our basic axios configuration, let's create a custom hook useUserLogin.ts in your src/hooks directory for our login api
import { useMutation } from '@tanstack/react-query';
import axios from 'axiosInstance';

type LoginData = {
  email: string;
  password: string;
};

const postUserData = async (data: LoginData) => {
  const res = await axios.post("user/login", data).then(res => {
    return {
      // Change the path of reading the values from response as per your backend reponse
      auth_token: res.data.data['X-Auth-Token'],
      refresh_token: res.data.data['X-Refresh-Token'],
    };
  });

  return res;
};

export const useUserLogin = () => {
  return useMutation((data: LoginData) => postUserData(data), {});
};
Now, in your home.tsx you can use the custom hook to log the user in
import { useEffect, useState } from 'react';
import toast from 'react-hot-toast';
import { useUserLogin } from '../hooks/useUserLogin';

const Home = () => {
  const [email, setEmail] = useState('');
  const [password, setPassword] = useState('');
  const { data, isLoading, mutate: login, isSuccess, isError } = useUserLogin();

  useEffect(() => {
    if (isSuccess) {
      toast.success('Login Successful!');
      localStorage.setItem('access-token', data.auth_token);
      localStorage.setItem('refresh-token', data.refresh_token);
    } else if (isError) {
      toast.error('Login failed!');
    } else return;
  }, [isSuccess, isError]);

  const handleSubmit = () => {
    login({ email, password }); // Login api call
  };

  if (isLoading) <div>Loading...</div>;

  return (
    <div>
      <form>
        <input
          value={email}
          onChange={e => setEmail(e.target.value)}
          type="email"
        />
        <input
          value={password}
          onChange={e => setPassword(e.target.value)}
          type="password"
        />
        <button onClick={handleSubmit} type="submit">
          Submit
        </button>
      </form>
    </div>
  );
};

export default Home;
At this point if the user has typed the correct credentials and everything works right, then user should be logged in successfully.
Congratulations!! 🎊 , we are almost there
Sending the access-token with every request
Now, there are multiple ways to achieve this, you can configure it in the default headers of axios, or you may want to configure the token individually for each request, sure go for it, kidding please don't do that. But here we're gonna use the super powerful axios interceptors to send the access-token.
Let's make some changes to our axiosInstance.ts file
import axios, { HeadersDefaults } from 'axios';

const axiosClient = axios.create();

// Replace this with our own backend base URL
axiosClient.defaults.baseURL = 'https://api.example.org/';

type headers = {
  'Content-Type': string;
  Accept: string;
  Authorization: string;
};

axiosClient.defaults.headers = {
  'Content-Type': 'application/json',
  Accept: 'application/json'
} as headers & HeadersDefaults;

// Adding Authorization header for all requests

axiosClient.interceptors.request.use(
  config => {
    const token = localStorage.getItem('access-token');
    if (token) {
      // Configure this as per your backend requirements
      config.headers!['Authorization'] = token;
    }
    return config;
  },
  error => {
    return Promise.reject(error);
  }
);

export default axiosClient;
Now, everytime you import the axios instance from this file and use it to make api calls, the Authorization header will be automatically included by the interceptor.
At this moment the user can browse the platform normally until the access-token expires, and when it does we need to configure our interceptor to refresh the token in the background without the knowledge of the user.
Let's jump in to the refresh token part.
Refreshing the token using the interceptor
In your axiosInstance.ts file, let's add one more function
import axios, { HeadersDefaults } from 'axios';

const axiosClient = axios.create();

// Replace this with our own backend base URL
axiosClient.defaults.baseURL = 'https://api.example.org/';

type headers = {
  'Content-Type': string;
  Accept: string;
  Authorization: string;
};

axiosClient.defaults.headers = {
  'Content-Type': 'application/json',
  Accept: 'application/json'
} as headers & HeadersDefaults;

// Adding Authorization header for all requests

axiosClient.interceptors.request.use(
  config => {
    const token = localStorage.getItem('access-token');
    if (token) {
      // Configure this as per your backend requirements
      config.headers!['Authorization'] = token;
    }
    return config;
  },
  error => {
    return Promise.reject(error);
  }
);

axiosClient.interceptors.response.use(
  res => {
    return res;
  },
  async err => {
    const originalConfig = err.config;

    if (originalConfig.url !== '/user/login' && err.response) {
      // Access Token was expired
      if (err.response.status === 401 && !originalConfig._retry) {
        originalConfig._retry = true;

        try {
          const rs = await axios.post(
            'https://api.example.org/user/refresh',
            {
              headers: {
                Authorization: localStorage.getItem('refresh-token')!
              }
            }
          );

          const access = rs.data.data['X-Auth-Token'];
          const refresh = rs.data.data['X-Refresh-Token'];

          localStorage.setItem('access-token', access);
          localStorage.setItem('refresh-token', refresh);

          return axiosClient(originalConfig);
        } catch (_error) {
          toast.error('Session time out. Please login again.', {
            id: 'sessionTimeOut'
          });
          // Logging out the user by removing all the tokens from local
          localStorage.removeItem('access-token');
          localStorage.removeItem('refresh-token');
          // Redirecting the user to the landing page
          window.location.href = window.location.origin;
          return Promise.reject(_error);
        }
      }
    }

    return Promise.reject(err);
  }
);

export default axiosClient;
Now there are a couple of things happening here, let's go through them one by one
This function intercepts all the responses from server, and if there are no errors then it returns it as it is.
If there are any errors, then it first saves the attempted route of the user in
originalConfig, so that when it refreshes the token it can redirect the user to the same route, which will appear like nothing happened in the background for the user.Then we are checking whether the route the user is attempting is the login route, because obviously if the user has entered wrong credentials then server will anyway throw an error, we don't need to refresh the token in that case.
If it's not the login route and the error code is
401 Unauthorisedthen we call the API to refresh the token by including therefresh-tokenfrom our localStorage in the header.After getting the response from the server, we replace our old access-token and refresh-token with the new ones and redirect the user to the previously attempted route.
We have kept the refresh token api call in the try block, so in case our refresh-token is expired and it throws an error, we come to the catch block, where we remove the token from localStorage, log the user out and redirect to the home page.
That's it!! Now we have the complete rotating refresh token flow set up.
Now, there are so many places where it could go wrong, so if you are facing any issues please go through all the steps again or let me know in the comments, I'll be more than happy to help you out 😃.